Drywall is constructed with maximum sturdiness, but can become damaged if handled aggressively. To maintain the best condition possible, there are a number of measures that can be taken. Once it’s been damaged, however, repairs are the only option.
These repairs require a time-tested method. Here are the fundamental steps that we follow in Maryland when we fix drywall.
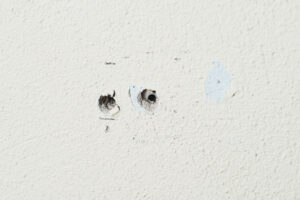
Fixing Small Holes
The easiest yet trickiest hole to repair is a tiny one. In order to ensure that the hole is stable, putty must be used to completely cover it. However, once it’s been fixed, it’s the simplest to blend back into the wall.
These are the most typical holes you’ll come across, since they’re frequently produced by nails or other small punctures. Your wall likely has more small holes than you realize. Hiring a professional drywall specialist who will take care of them as they go is essential to a beautiful paint job. Otherwise, even the smallest hole might be seen under a fresh layer of immaculate paint.
1st Step
The first step towards fixing any minor holes is to clean your drywall. Wallboard seldom experiences uniform wear and tear. The hole must be level and without jagged edges in order to facilitate mending.
To create a tiny hole, carefully cut around the hole’s edges with a knife until its exterior is slightly larger than its interior. By doing this, you’ll have a level surface that’s free of the jagged edges often present when a puncture occurs.
2nd Step
Once the hole has been uniformly cut, you can start filling it in with painter’s putty. Professional painters are the most skilled at drywall repair since their job requires them to do it frequently.
Once the putty has been applied, scrape away the excess to make it level with the wall. Once this step is complete, give it some time to cure.
3rd Step
Even if you did a great job in the previous step, some smoothing will likely be required after the putty dries. Rough edges will need to be smoothed out and lumps need to be taken care of. This is done by sanding away the excess until the repair area is flat with the rest of the wall.
One thing to keep an eye on during this step is texture. Drywall is smooth, so make sure the area you’re patching is as well.
4th Step
Finally, cover the sanded putty with spackle. This will make the hole totally vanish. It also creates an equal surface, making it simple to paint over the repair.
This process might need to be repeated to achieve the ideal spackle covering. It should cover all of the putty and be as flush to the wall as possible. When the spackle has dried, paint over it to make the patch blend in with the rest of the wall.
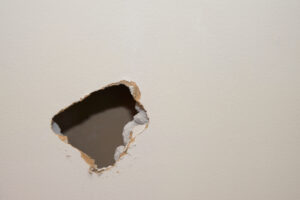
Fixing Medium Holes
These are little, easy-to-fix holes and cracks. They’re too big to fill with putty yet small enough for a repair. The best option is to let a contractor perform the work. They have the training to ensure nobody knows a hole was there in the first place.
1st Step
Surprisingly, a medium-sized hole in your drywall could be simpler to repair than a small one, thanks to the technique of using a metal patch. Here’s step 1…
You must first sand the wall and the hole down a little before applying your metal fix. The area surrounding the repair has to be sanded clear of any sharp edges or rough areas. Once that’s done, the metal can be placed.
2nd Step
Be sure you don’t skip this crucial step! Make sure all of the sanding dust is removed from the wall after you’ve smoothed the area. Otherwise, it’ll be difficult for the patch to adhere and might give your mended wall an unattractive texture.
Many people make the mistake of skipping this step. Doing so will mean your repair efforts fall apart.
3rd Step
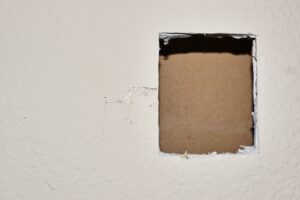
You may start applying the metal patch after properly sanding and cleaning the wall. These work much like stickers. Peel off the paper covering the adhesive back, and apply it to the hole. Be sure to center it as well as you can.
These patches are available in a range of sizes, so you should always be able to find one that works for the hole you’re trying to fix.
4th Step
You may start blending in your patch once it is securely secured in place. Your drywall repairman will unquestionably have a compound to use for this. To make it fit in with the remainder of the wall, this compound is applied over the patch and fanned out on the sides.
This step must be completed accurately to avoid leaving a noticeable wall patch. To the patch, your compound should be as flat as possible and gradually thinner as it approaches the edges..
5th Step
Your cured compound has to be sanded until it matches the wall. To completely hide the patch and have it blend in, you might need to apply extra compound and repeat the sanding process.
It will probably take a few tries to get this just right. Allow your drywall professionals to do their work without worrying; they’ll know how to accomplish it swiftly and effectively.
Fixing Large Holes
The greatest labor is needed to repair large holes. Your skilled specialist will be aware of exactly what needs to be done to restore the fresh appearance of your drywall. Knowing these procedures can help you to comprehend any additional fees associated with fixing a huge hole.
1st Step
Patches made of drywall are necessary for larger holes. On top of a bigger hole, a mesh patch can’t be made to appear seamless. Finding an area of drywall that is a bit larger than the hole you have is the ideal place to start.
In order to give yourself room to conceal it, you should make the patch you cut out slightly larger than the hole. Additionally, you must guarantee that the patch matches the thickness of the drywall where the hole is located. You won’t get the seamless appearance you are hoping for if the piece you’re using is thicker than the wall you’re trying to fix.
2nd Step
Over the hole, trace the perimeter of the square you just cut. In order for your patch to be even and formed in a way that’s simple to fill, you’ll need to make the hole in your wall match the shape of what you’ve already cut.
Keep the area you plan to cut a little bit smaller than the patch of drywall you’re using. This provides you some leeway for blending and a little room to trim lines that aren’t perfectly straight.
3rd Step
Verify that the area where you plan to cut doesn’t have anything behind it that could be damaged. Before you put a knife anywhere near the hole, put your hand inside of it. Feel around to make sure there are no wires or cords around.
Cutting into wires by accident could be dangerous and costly, as could using tools that aren’t ideal for the job. Make sure you have a sharp knife that’s designed for cutting through drywall so it doesn’t slip and hurt you.
4th Step
You may start sawing into the drywall after you are certain it is secure enough to cut into. Keep as close as you can to the shape you have sketched. To create a more seamless finish, you want your repair piece to conform tightly against the wall.
Continue comparing the patch you’ve created to the hole you’re cutting. While you don’t want it to be much larger than the patch, you also don’t want it to be much smaller. This would make the repair visible once all said and done.
5th Step
Once your patch has been cut out, you must provide it with something to grip onto. To do this, cut off two thin pieces of wood, one for the top and one for the bottom, and screw them in. You’ll have something to attach your patch to as a result, allowing for a tight fit.
Drill the patch into the two pieces of wood, being careful not to damage it. Drilling too deeply might result in fractures. Your specialists will understand how to avoid this and maintain the ideal state of your patch.
6th Step
The identical procedures you used on the medium-sized hole will now be used on this one. So that it has something to fill the tiny gaps between your patch and the wall, place your mesh patch over the drywall repair. By doing so, the gap between your patch and the drywall will disappear.
To ensure that your patch sticks to the wall, make sure to clean up all wood shavings and wall fragments before applying it. The greatest technique to achieve a strong connection with the wall continues to be a perfectly clean surface. Once your wall has been thoroughly cleaned, just peel the sticker from the patch’s back and adhere it.
7th Step
Apply the drywall compound over the mesh, continuing to treat this hole in the same manner you would a smaller one. To make it blend in with your wall, complete this as evenly and smoothly as you can. Even if a wall is painted, bumps will still be noticeable.
Sanding should come next, and then you should repeat this process until everything is smooth. Following that, paint should be applied evenly and on a flat surface.
To Sum Up
A hole of any size may be repaired using a tried-and true method. The majority of them will require patching and mixing. If you’re trying to patch for the first time, it’s a challenging task to get just right.
The easiest approach to ensure a wall with well-blended repairs and the greatest appearance is to choose a business with experience. It’s essential to consult a specialist to ensure the patches are level enough for a smooth coat of paint.
Different hole sizes necessitate different repair procedures. It might be challenging to determine when a hole requires a full repair rather than just a metal patch. The easiest way to be sure is to consult with a specialist.
Any qualified drywaller working for our organization in the Maryland region will adhere to these fundamental techniques. It can be challenging to fill holes since it requires a deep knowledge of the process. You will be satisfied with Robey Inc of Maryland’s expertise. Trust that when we’re through, you’ll have a lovely, evenly-painted wall that’s free of holes.